So, after a prolonged half term break my mixed media collage course is back up and running for another 10 week block in Leicester. Four weeks into the latest run and all is going nicely. The real beauty of college is that everyone has their own unique method & style of working. It’s nice and refreshing to see everyone’s work, but it does mean that when teaching about collage, students will like or loath the lessons in equal measures. Some people work very neatly, plan ahead and execute their work in an almost regimented fashion, while others work a lot looser and simply go with the flow. I personally tend to follow the latter, but I know that’s not to everyone’s liking.
")
For the last 2 weeks of my course I’ve been trying to explore a looser, more hap-hazard approach to creating collage. It’s a method of working that incorporates a lot of different layers and uses many different mediums & techniques. For me, layering your collage is really important. take your time, build your artwork up slowly and don’t worry about ‘messing it up’.
For this example I started by ripping fairly large pieces from a magazine. These images were then glued onto my A3 drawing paper using watered down acrylic gesso. Yes I did select what images or magazine cuttings I used, but most of this initial layer will disappear, so I didn’t really worry too much about what went down.
Using the gesso, I then brushed over the artwork. The more watered down the gesso, the more transparent the gesso will dry. Thick undiluted gesso will dry white and give your artwork a textured finish to build onto.

After the 1st layer has completely dried I then look at the work and highlight areas that I particularly like. These are the areas that guide the next layer. For this piece it was simply colour; I noticed a few small areas of faint yellow colour after the 1st layer and decided to emphasise this on the 2nd layer by adding tissue and paper that complimented each other. I was also keen to add a few images at this stage; still conscious that much of what gets added early on will undoubtedly get covered later.
For the large rectangular image bottom right of this piece, I used an image transfer method. An image was selected & ripped from a fairly glossy/inky magazine (these tend to work best) and the image side was covered with a thick layer of gesso (acrylic paint works equally well, but will colour your transfer). The image is then placed (image side down) onto the artwork and firmly pressed or rollered. This is then left to dry completely.

The following day the work was 100% dry and it was time to see if the image transfer had worked (it’s not an exact science!!!). You can use a wet sponge or rag for this, but I just tend to use my fingers, and the process is pretty simple. Water is added to the magazine cutting until it is so wet that the paper will rub away. If it’s worked properly the cutting can be rubbed entirely away and you’ll be left with the initial image that you painted the gesso or acrylic paint onto. I find it a nice way to add images subtly to your artwork. Just be careful not to rub too hard or you may end up rubbing away more than you bargained for 😯
With the artwork now fairly wet again, it was time to leave it once more…

For the next layer I wanted to add a splash or two of colour, and this time I decided to use first gesso and then some acrylic paint. The gesso was used undiluted & fairly sparingly in areas of the artwork I felt like covering slightly. Some of the text & images from the very first layer were still faintly showing through in places, which I liked. Other areas I felt worked less well and these were the areas I wanted to work on now. I used a piece of cardboard to scrape the gesso across the artwork. This was mainly to add texture, rather than to add any colour.
With the gesso dry I then went ahead with adding colour. The metalic bronze paint I’ve used here was applied straight from the bottle and simply smeared across the work with my finger. Even at this stage, I was still aware that a lot of this work would end up hidden or slightly covered. I was also still approaching this work with a completely open mind. After each new layer, I would then assess the work and see which direction to go with it.

At this point I decided to add a few bold images & cuttings to the work. As with most of my collage work, a lot of images are selected, played with, edited and discarded, before I finally decide on what goes where. For this piece I selected a fairly large image from a glossy glamour magazine and some old printed out music scores which seemed to fit with the colour scheme. To tone down or blend in the new layer, I also used more rubbed in gesso and some tissue.
At this point I could sense that I was nearing the end. I was fairly happy with a lot of what I’d got. So I now needed to be careful not to spoil what I liked. Again, this isn’t an exact science and sometimes I’ll ‘battle’ away with a collage for days before I find my way with it.

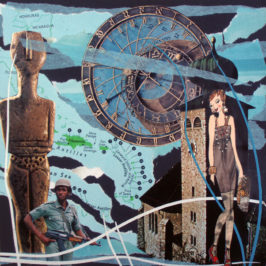
I was still keen to add a little more to this work, and in some ways, the nearer to the end you get, the easier it is to know what fits & what doesn’t. It’s also easier to know where things need to go and where to leave well alone. Initially I wanted to put the tall figure onto the left of the artwork, but felt the image would dominate more than I really wanted. So I decided to trace the image onto a piece of white tissue-paper instead. Unfortunately the traced image would’ve been too faint and lost. I then experimented with placing the traced image over the top of the original image. I did like the effect and for a long time this was the way I was going to go, but in the end I reverted back to using just the original image 🙄
 The final (maybe?) additions to this work were a few ripped strips of yellow tissue. If I’m honest, I’m not entirely convinced that this is finished yet, but for now I’m happy to put it to one side 🙂
So there you have a mixed media collage from start to finish (maybe!!!). This little journey lasted about 3 weeks and for most of that time I had absolutely no idea what the finished artwork would look like (I very rarely do). I simply treat it as an experimental journey. Some journeys are more successful than others, some last a lot longer than others and some never even make it to the end. It’s just the way I like to work.